November 19, 2023

Zig Zag Path Block Tutorial


I select quilt blocks and color palettes for the charity quilts that the Knoxville Modern Quilt Guild makes as a group, and I chose this traditional Zig Zag Path block for our next group quilt. I found a tutorial online already, but it was short on details and didn't give much room for error in the HSTs, so I've created a new tutorial here. The block is 12.5 inches unfinished.

Cutting List

Background (gray in photo)

  • Three 5-x-5" squares
Color A (dark in photo)

  • Two 5-x-5" squares
  • One 4.5" square (set this aside until the final assembly)
Color B (light in photo)

  • Three 5-x-5" squares
Piecing

  1. Draw a diagonal line from one corner to the other on the 3 background squares and 1 Color A square. 
  2. Pair up the squares as follows:
    • two gray + two Color B
    • one gray + one Color A
    • one Color A + one Color B
  3. Sew 1/4" away from both sides of the diagonal line on each block pair.
  4. Cut on the line and press toward the darker fabric. You should have 8 half-square triangles.
  5. Trim each HST to 4.5-x-4.5".
  6. Arrange the HSTs and the remaining Color A square according to the photo above.
  7. Assemble blocks into rows, pressing the seams in opposite directions on each row so that they will nest together.
  8. Sew the rows together, and press seams open.
  9. The block should be 12.5-x-12.5".

Multiple blocks arranged together create a spiraling effect.


July 1, 2023

Splendid Sampler Quilt


I started this project in 2016, making the pieced blocks as part of the free online Splendid Sampler quiltalong hosted by Pat Sloan and Jane Davidson. The blocks came from a variety of designers on a daily or weekly basis -- I don't remember exactly, but there were a lot of them! I started making blocks from a stack of fabrics that I thought worked well together, and I continued printing off the pattern instructions even after I made 24 blocks and then wandered away from the project. The blocks were a little small for my liking (6.5" unfinished), my fabrics didn't always translate well to the piecing, and I lost interest.


Years later, I decided to empty the storage box that the project was in. I cut the remaining print fabrics into large squares, alternated them with the pieced blocks, and sashed it all in a coral-colored solid from my stash. Then the top sat for a while in my sewing room closet until I found the right backing and quilted it up in a simple crosshatch design.


I'm happy to have it done after all these years. I'm donating it to my local chapter of Project Linus so that a child might see it, love it, claim it, and enjoy it for many years to come.

May 21, 2023

Picket Fence Block Tutorial


I select quilt blocks and color palettes for the charity quilts that the Knoxville Modern Quilt Guild makes as a group, and I recently found a tutorial for this Picket Fence block. Unfortunately, when I tested the instructions, I found some errors, so rather than just share a link, I'm creating a new tutorial here.

Cutting List

White fabric

  • Two 3 1/2" x 6 1/2" strips
  • Two 3 1/2" x 3 1/2" squares
  • Two 6 7/8" x 6 7/8" squares
Color A

  • One 6 7/8" x 6 7/8" square
  • One 3 7/8" x 3 7/8" square
Color B

  • One 6 7/8" x 6 7/8" square
  • One 3 7/8" x 3 7/8" square

Piecing
 (use a scant 1/4" seam allowance throughout)

  1. Draw a diagonal line on one of the colored 3 7/8" squares. Put it with the other small colored square, and sew 1/4" away from each side of the line. Cut on the line, and press to the darker side. You should have two 2-color half-square triangles. Square them up to 3 1/2".
  2. Draw a diagonal line on each of the colored 6 7/8" squares. Put each one with a 6 7/8" white square, and sew 1/4" away from the each side of the line. Cut on the line, and press to the colored side. Square them up to 6 1/2". You should have four white/color half-square triangles. You will only use one of each in the final block.
  3. Arrange your block components to make sure the color placement is correct. Take care that the two small HSTs are positioned the same way, with the same color in the upper right.


Block Assembly
  1. Sew a small white square to a small HST, and press toward the white. Sew the white rectangle to the side of that unit, and press toward the rectangle. This is the small HST quadrant.
  2. Sew the small HST quadrant to the large HST next to it. Press toward the large HST.
  3. Sew the two halves of the block together. Press the seam open.
  4. The block should measure 12 1/2" x 12 1/2".

May 7, 2023

Lucy Boston Variation Quilt


I'm happy to share that this quilt is finally finished after almost 6 years in the making! It started as a hand-sewing project I threw together quickly for a trip to Dallas to visit a good friend and her twin newborns. Here's the first block I made:


After that first block, I was fully hooked and continued making blocks using original Cotton + Steel fabrics and then Ruby Star Society prints paired with Andover chambrays (I had a fat quarter bundle that I drew from exclusively) for the corners. I wrote a little bit about my process in 2018, about 6 months into the project. It's funny to look back and see how it was going all that time ago.


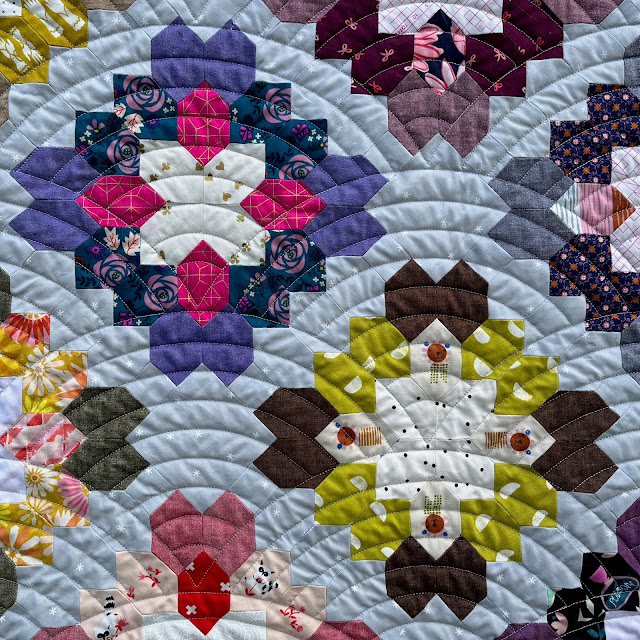
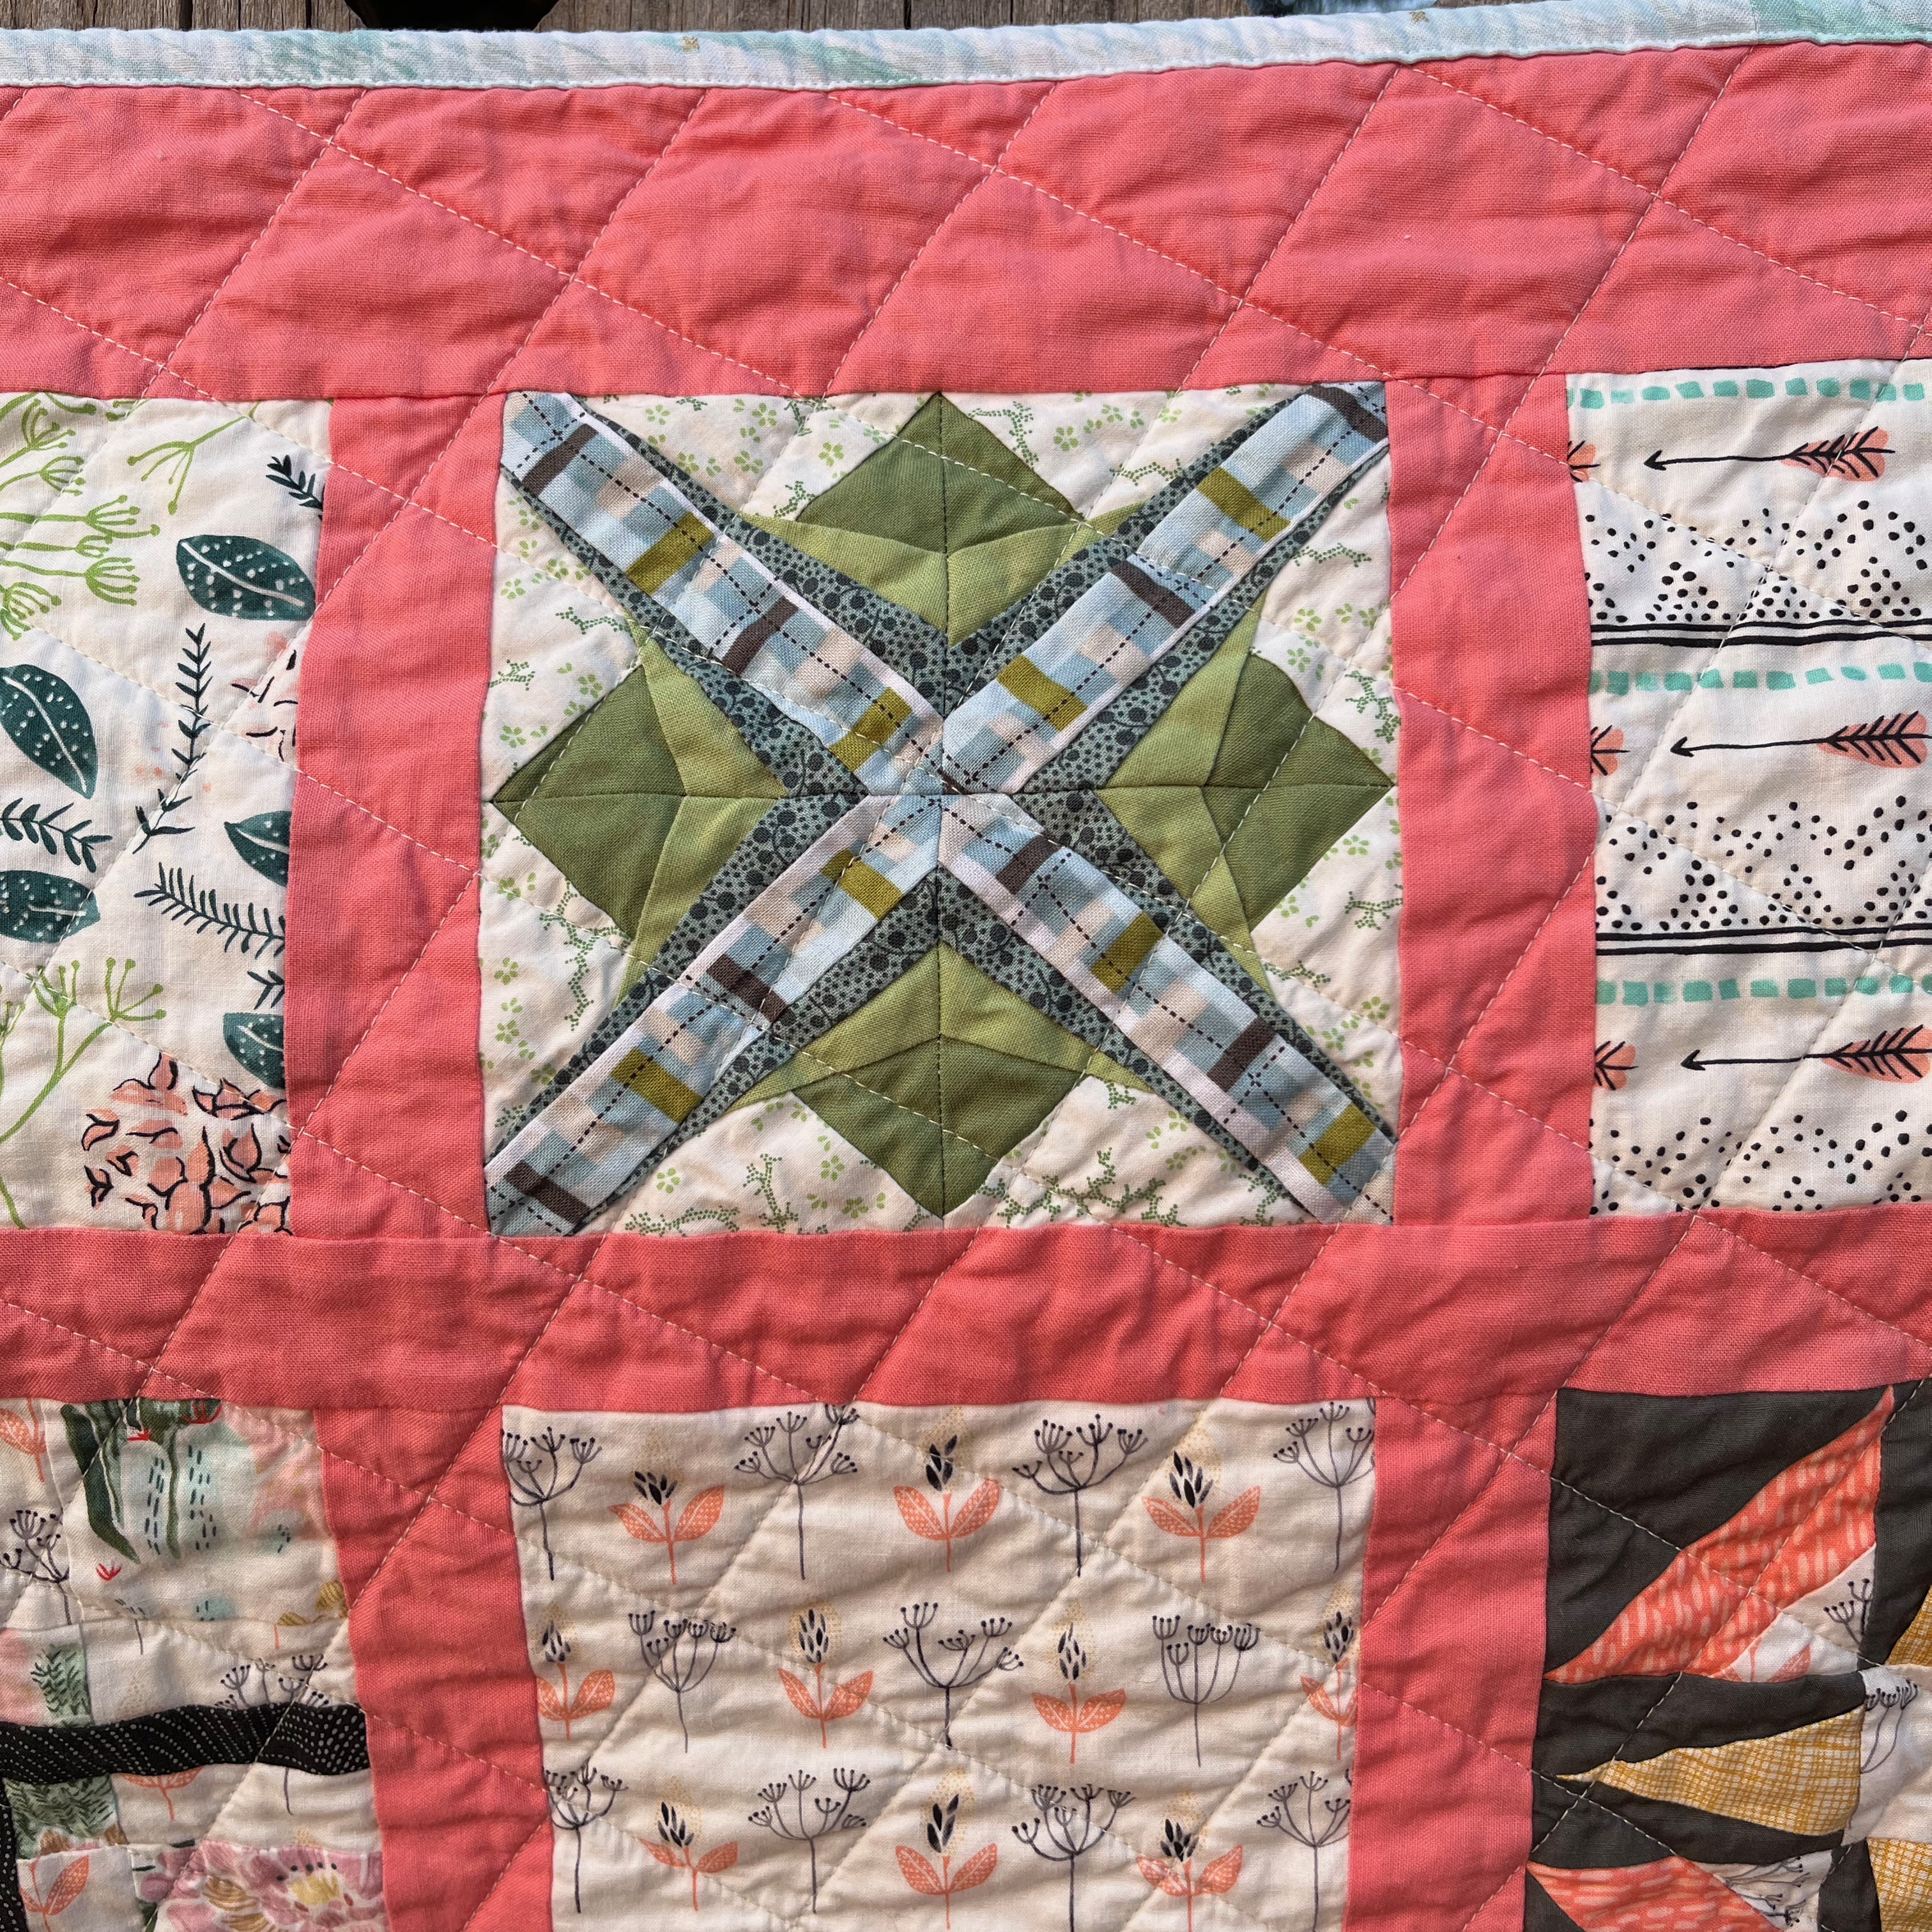
All the individual blocks are documented on my Instagram (@elizabethquiltsplus) under #inspiremelucyboston, if you'd like a closer view of each one. Depending on the fabrics, some are fussy cut to highlight a particular motif, and some are not. I love them all, but here are a few of my favorites:


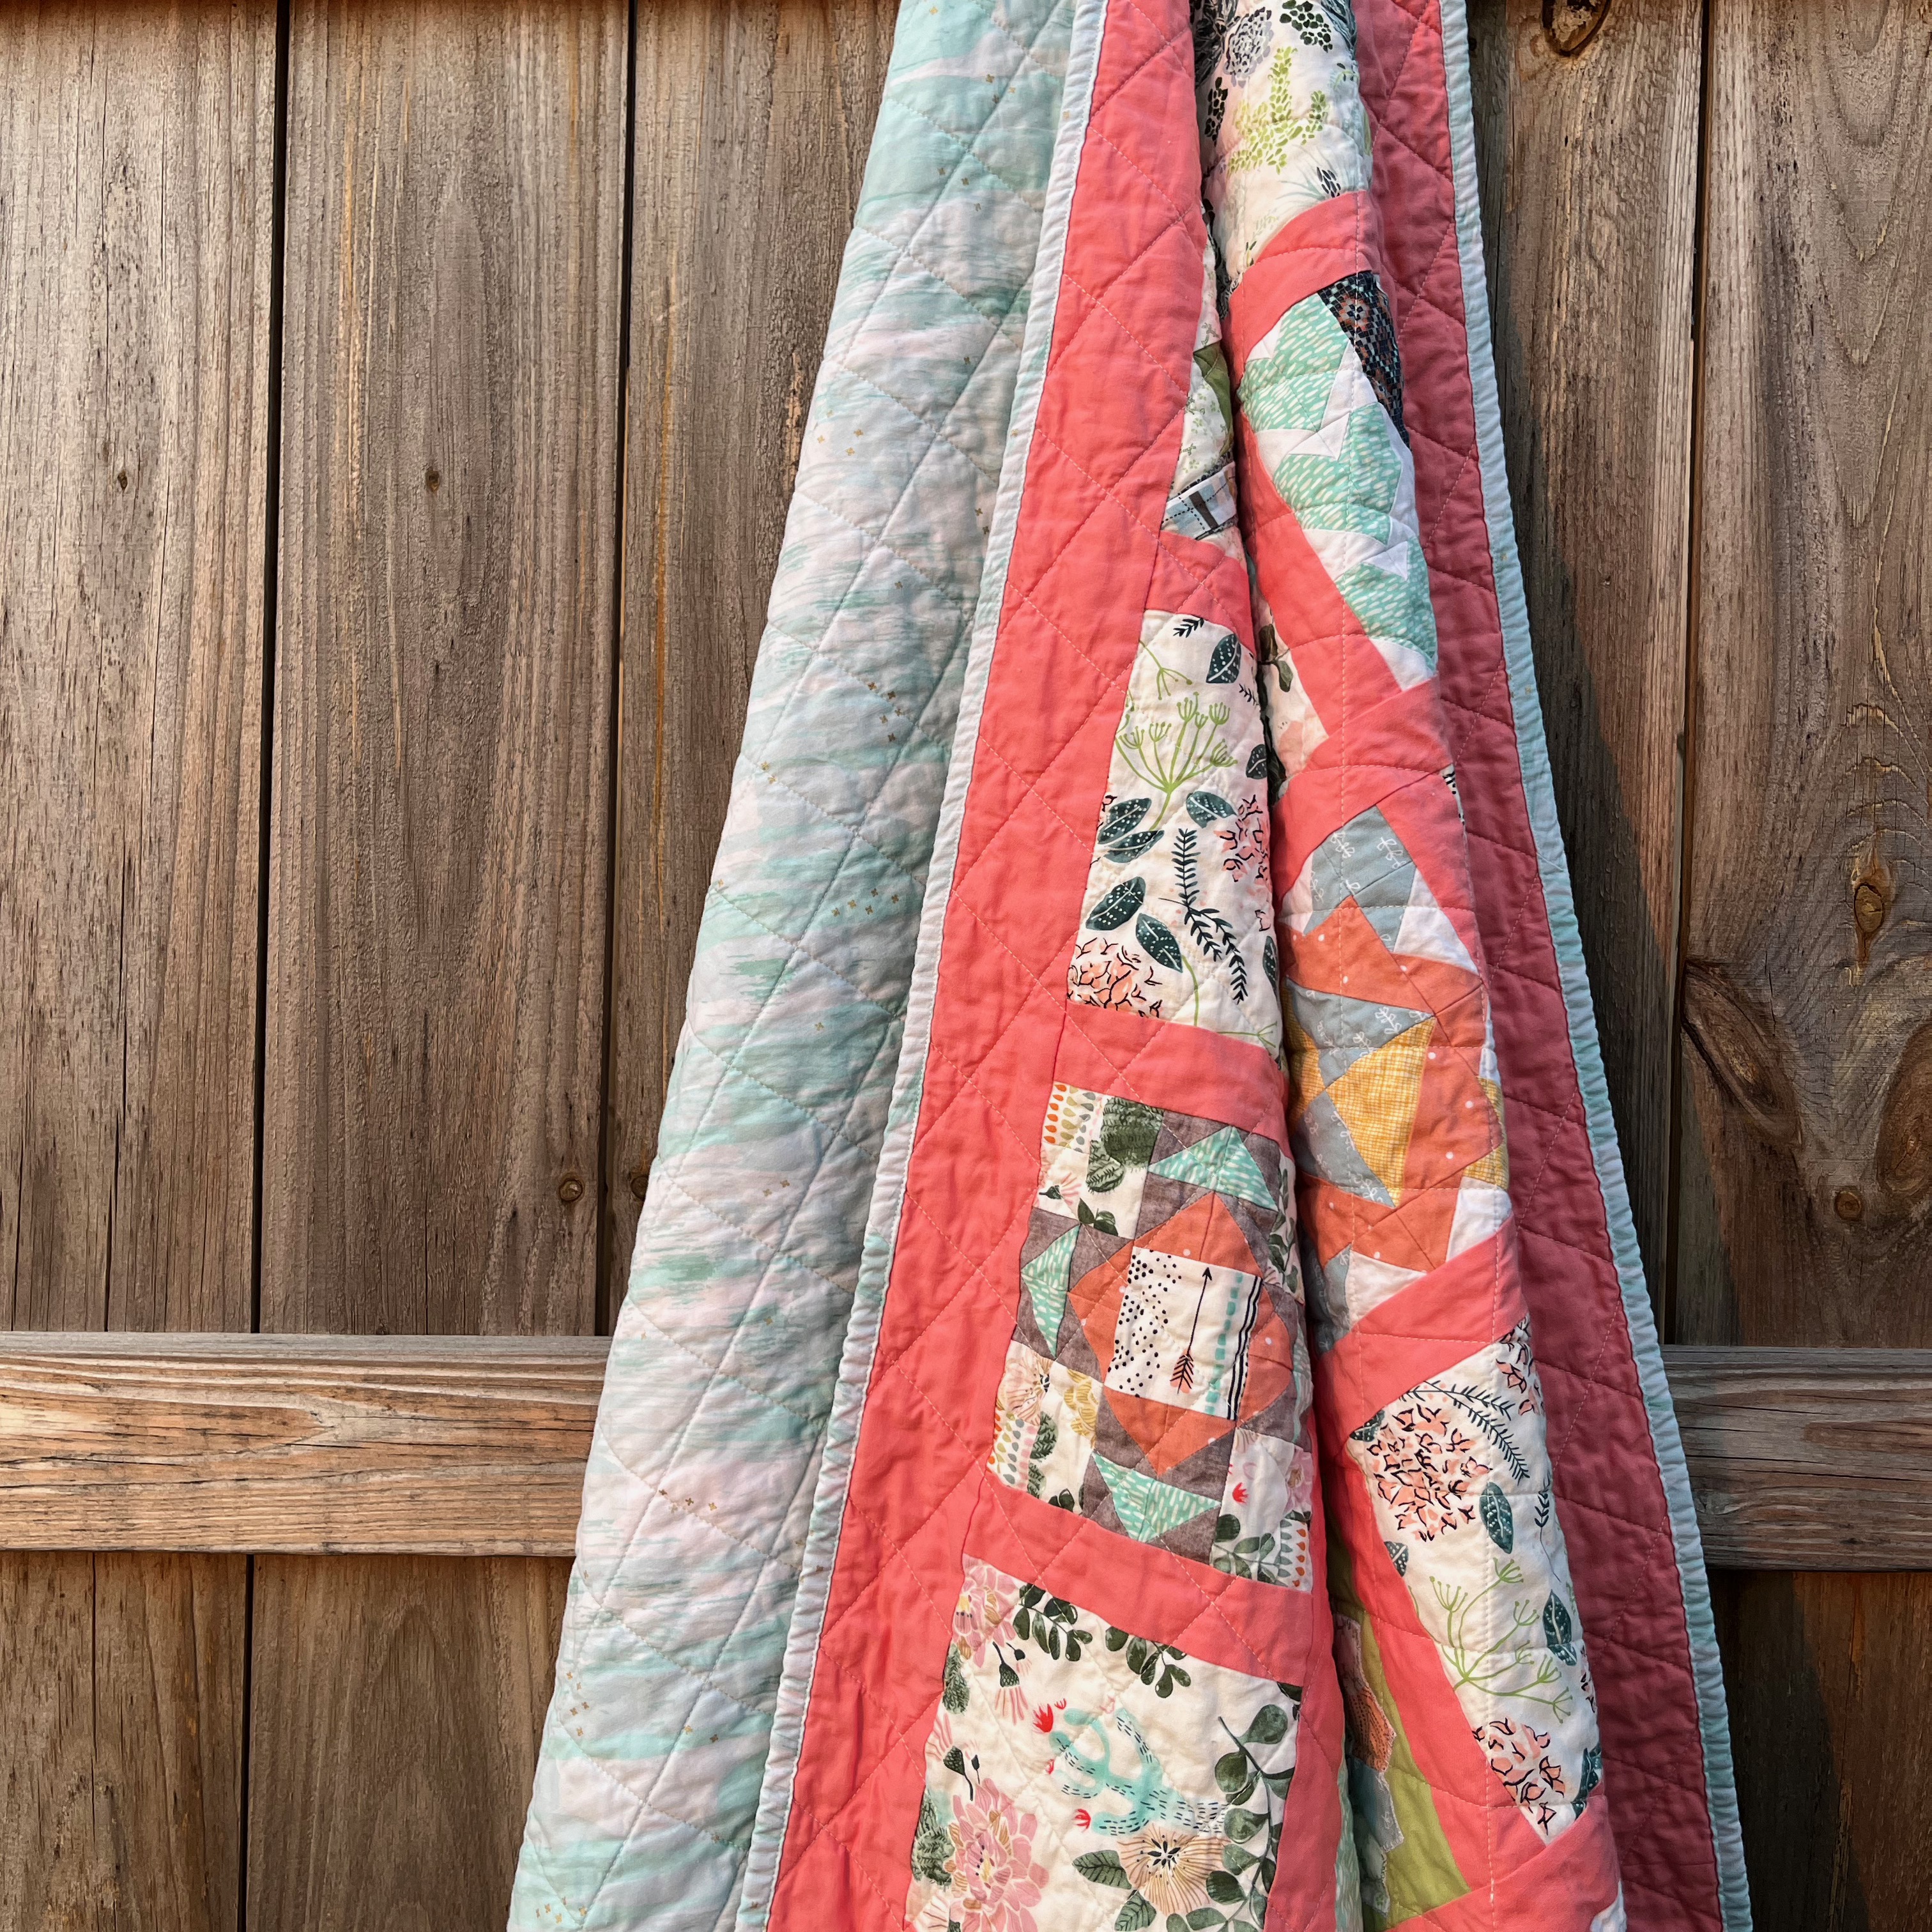
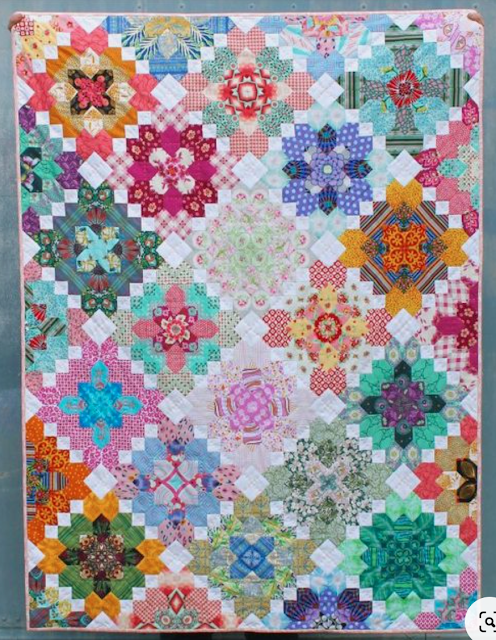
The final block count is 41 whole blocks, 16 half blocks around the edges, and 4 quarter blocks in the corners. For the layout, I decided pretty early on to do something a little different from the traditional Lucy Boston/Patchwork of the Crosses, which has a lot of joining/background blocks. I found the Lucy's Terrace version by Tales of Cloth and loved the on-point layout and minimal background:


In the end, I kept the blocks on point but changed the background a bit, using honeycombs where this one has small squares, and I put small squares next to the big squares. I used a dove gray RSS blender, Spark, for the background and love it so much with all the colors in the rest of the quilt. I'm glad I went with a color and not white for the background.


A lot of EPP projects like this end up as blocks sewn to background squares as applique. I knew I didn't want to go that route, but piecing the entire top was quite a challenge. And no one really talks about what happens after you make all the blocks! Sewing the blocks into rows was mostly fine once I got the hang of it, but sewing the rows together was really an adventure, having to adjust and turn and fold and contort everything to be able to get into all the angles. Honestly I'm shocked that it all came together and all the pieces actually fit!


I recorded the date of my final stitches on the quilt top -- June 23, 2022. That's almost exactly 5 years after I finished the first block in 2017! After the top was complete, I'll admit that I let it sit while I thought about how to quilt it. I considered hand-quilting, but that would have taken a lifetime, and I was concerned about hand-quilting through all the seam allowances (there isn't much open space in this quilt!). In the end, I decided that done was better than "100% made by hand," and I handed it off to my go-to local longarmer. I wanted the quilting to be traditional, and we decided on the classic Baptist fan.


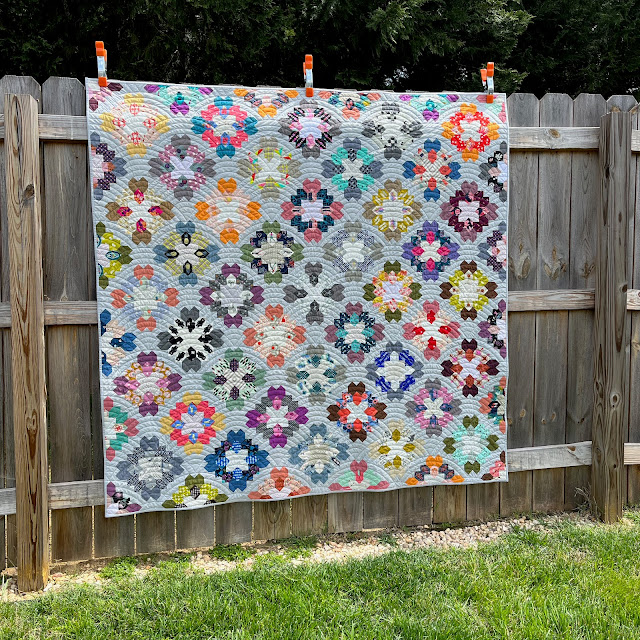
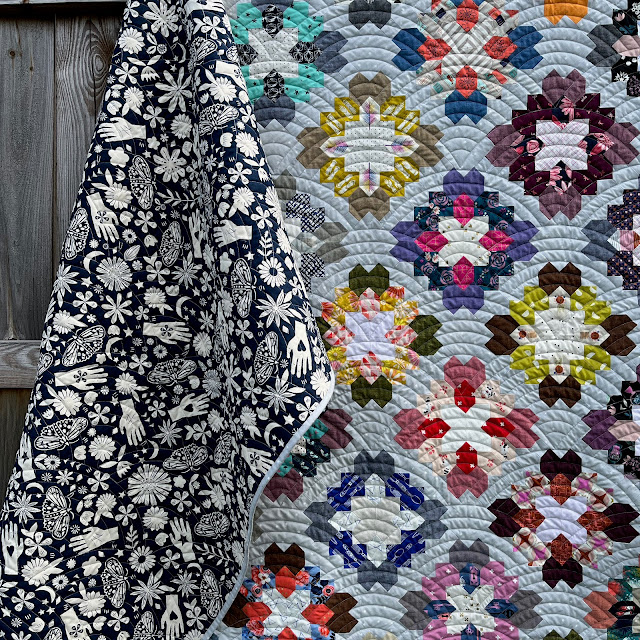
I'm so thrilled with how it turned out. The quilting creates a lot of great texture and bounces the eye around the quilt without distracting from the piecing and the blocks. The size is roughly 65x65 -- plenty big enough to actually use if I decide to put it on my bed or use it as a throw for a little while. The backing is a wideback by Alexia Marcelle Abegg for Ruby Star Society (gotta keep on theme with the front!). I'm always drawn to navy (this print also comes in peach and light blue, and I considered all of them), and the hands in the design are a nice callback to the hand-piecing.


All in all, I'm happy to have this quilt finished and feel quite proud that I stuck with it to the end. Honestly I really loved the process of making the blocks, taking my little EPP kit with me on vacations and pretty much anywhere I thought I might have some downtime. Picking out fabric combinations was a lot of fun, and I kinda miss it! I have some templates and papers for other EPP designs, and I plan to start a new project soon.

April 30, 2023

Two Quick Stash-Buster Quilts

While I'm in between big projects, I've been working on some relatively quick and small quilts that use up stash fabric.


The first quilt is simple pastel patchwork that came about because the box that contains my random charm squares (5x5 inches) was too full to close. I usually cut charms and add them to the box when I have odd pieces of fabric left over from a project or if I know the prints will work for a Project Linus donation quilt at some point. So for this quilt, I pulled out all the pastels I had and cut a few more to get it to this size. The more interesting thing about this quilt is the assembly -- I used the quilt-as-you-go method of basting backing and batting together and then adding each horizontal row of already pieced squares to the top, quilting across it a few times before adding the next row of pieced squares.


The second quilt is my version of Ruby Star Society's free Moon Cake Quilt pattern. I saw this quilt when a quiltalong was announced, and the piecing stood out to me because it's graphic and has some order to it. Honestly, I saved the photo but didn't really look at the pattern -- it uses a layer cake, which I didn't realize at the time, so I may make another one eventually and actually follow the pattern! Instead, I used 5" charm squares again, pairing prints with solids. The 2x4 piecing requires 4 charms of each fabric in the pair. It was another great one for digging into my stash and finally using up some fabrics that I've had for a very long time. I'm in the process of free motion quilting it right now, with a stashed twin-size bedsheet that was perfect for the back.


Moon Cake quilt pattern


April 2, 2023

QuiltCon 2023 Workshop Projects

I'm officially 2 months behind on my goal of monthly blog posts, so I've taken a moment to be a little disappointed in myself, and now I'm going to try to catch up. First up is what would have been my February post...

My mom and I attended 2 workshops at QuiltCon 2023 in Atlanta. The first was Scrap Swap Social with Wendy Chow (@the.weekendquilter). Everyone brought scraps, which were sorted by color, and then Wendy instructed us in making a mini quilt using fusible grid interfacing. I used the grid interfacing many years ago, so I understood the basics, but Wendy shared some tips that made for a more precise completed project.


When I was selecting my scraps, I started with the abstract floral and then chose others that went with the color story. The low volume sashing and overall emphasis on peach are right in my comfort zone. I finished the 15x15 inch mini quilt top in the workshop and brought it home for quilting and binding. Now it hangs in my home office so I can admire it Monday through Friday.

The second workshop we took was Scraptacular Improv with Rossie Hutchinson (@rossiecrafts). Another scrap-focused class! Improv is not my strength or preference, but Rossie shared some strip-piecing and patchwork techniques that gave the improv process a little more structure and order.

For this workshop, we were told to bring in scraps or precuts. This is what I brought and arranged in a way that I thought was pleasing and could inform my piecing:


Not surprisingly, I leaned into peach and low volume neutrals, plus my other favorite, navy. During the workshop, I made the strawberry strip unit, navy checkerboards at the top, and green checkerboards that ended up in my finished piece:


This panel is approximately 18x32 inches. I plan to finish it and hang it on a wall in home. So that was my QuiltCon 2023 experience. Well, except for one significant souvenir...


This Juki machine replaces a secondhand BabyLock that I've had for a few years but never really loved or been that impressed with. We used these machines in Rossie's workshop, and the sale price on machines only used at QuiltCon was just too good to pass up. I look forward to logging many hours and cranking out projects (especially garments) on this new member of my Juki family (this makes 3!).


January 31, 2023

Neitherlands Quilt


In 2019, my mom and I attended QuiltCon in Nashville and took the Mystery Quilt Workshop with Jen Carlton Bailly (aka @bettycrockerass). We got copies of two of Jen's new patterns at the time, Find Your Fade and Neitherlands, a big set of curvy templates in various sizes, and the choice of patterns to work on in the workshop. We both decided to make a Neitherlands block, and I finished one during our time with Jen. I made one more block when I returned home, but then I packed the project away and put it on a shelf ... until last fall. I pulled the project box out again, grabbed some fabric, miscut that fabric as I knew I would (the templates and pattern are a little tricky to sort out when you haven't worked on it in a while) and then found my groove.


I had a lot of fun raiding my fabric stash to find prints that would work together and still provide the contrast necessary to get the full visual effect of the curved piecing. The dark centers are Peppered Cottons, which are yarn-dyed shot cottons, so they're not quite gray and not quite black.


The three blocks that make up this pattern all have different curves, so I got a lot of practice. I love cutting curved templates, but sewing them up can be tedious, so I had to tackle these in batches. I loved the results, though, so that helped motivate me to get each block assembled.


At almost 60x60 inches, this quilt was too big for me to want to quilt on my own, so I took it to my favorite local longarmer. I don't plan to keep this quilt for myself, so I was willing to try a pantograph that's a little wilder and more unusual than what I'm usually drawn to. This is Time Warp by Urban Elementz, and I love how the quilting curves play with the pieced curves, and the lines give the quilt amazing texture.


The backing, one of Anna Maria Horner's Echinacea prints, was destashed by a guild friend of mine, and I thought it was just perfect for this quilt that's already a riot of color and print. I did some print matching along the back seam, and it turned out really well. I couldn't decide what to use for binding until I found this pink print in my stash. The lines running across it have made it difficult for me to use in other projects, so I guess it was meant to be binding!


LinkWithin

Related Posts Plugin for WordPress, Blogger...